While on family break recently I got asked a simple question, ‘How do you build a website?’. It happened when I was stuck in a queue waiting to enter a local attraction and got talking to a couple about their new business idea.
Of course, part of their strategy was getting a website up and running and hearing I worked for a digital agency they were keen to seek my expertise. I did my best to describe the web design process while standing in the rain hiding under what was a tiny umbrella.
On returning to the office, it made me think I really need to write a blog post to answer that very question in more depth.
So, with that in mind I thought I’d go through our web design process here at Heckford and explain why each stage is so important to ensure success.
To kick things off let’s take a quick look at the 10 stages below.
- Discovery
- Project Scope
- Sitemap
- User Flow
- Wireframe
- Content Creation
- Visual Design
- Website Build
- User Testing
- Launch
Before I go on something to bear in mind is when working within an Agile environment this isn’t an entirely linear process.
Data gained from user testing may mean loops back through design and development when a proposed solution needs refining or didn’t work as intended. Its critical to allow for this flexibility to help ensure final product success.
Ok, so let’s break down each stage and get to look under the hood.
1. Discovery
To kick things off we always recommend a discovery session to better understand the client’s business and long-term goals. We also try to identify their key audience and discuss typical personas that will make up the bulk of their website’s users.
During this session, we get to talk about any existing company brand, tone of voice and whether they need help with more engaging content creation. We explore any preference in visual style and advise on styling ideas going forward.
We also touch on client budgets; a rough idea here can help us recommend a suitable solution and specification based around their target figure. The team discuss with the client about any preferred deadlines and realistic start dates.
2. Project Scope
At this stage we will have a clear idea of the website’s goals and can work with the client to define the actual project scope. Together we discuss what functions and features the site may be required to meet that goal.
The complexities of websites we create vary massively so it’s vital we pinpoint what functionality is needed early on. The danger here is project creep and is a common problem when it comes to building websites. Client expectations can quickly change along with an increase in desired page count, functionality, images and much more.
If the project scope does eventually grow, we explain that budgets and timelines will more than likely change to allow for any new features. It’s all about being honest with the client and working out what is possible and realistic within an agreed timeframe.
3. Sitemap
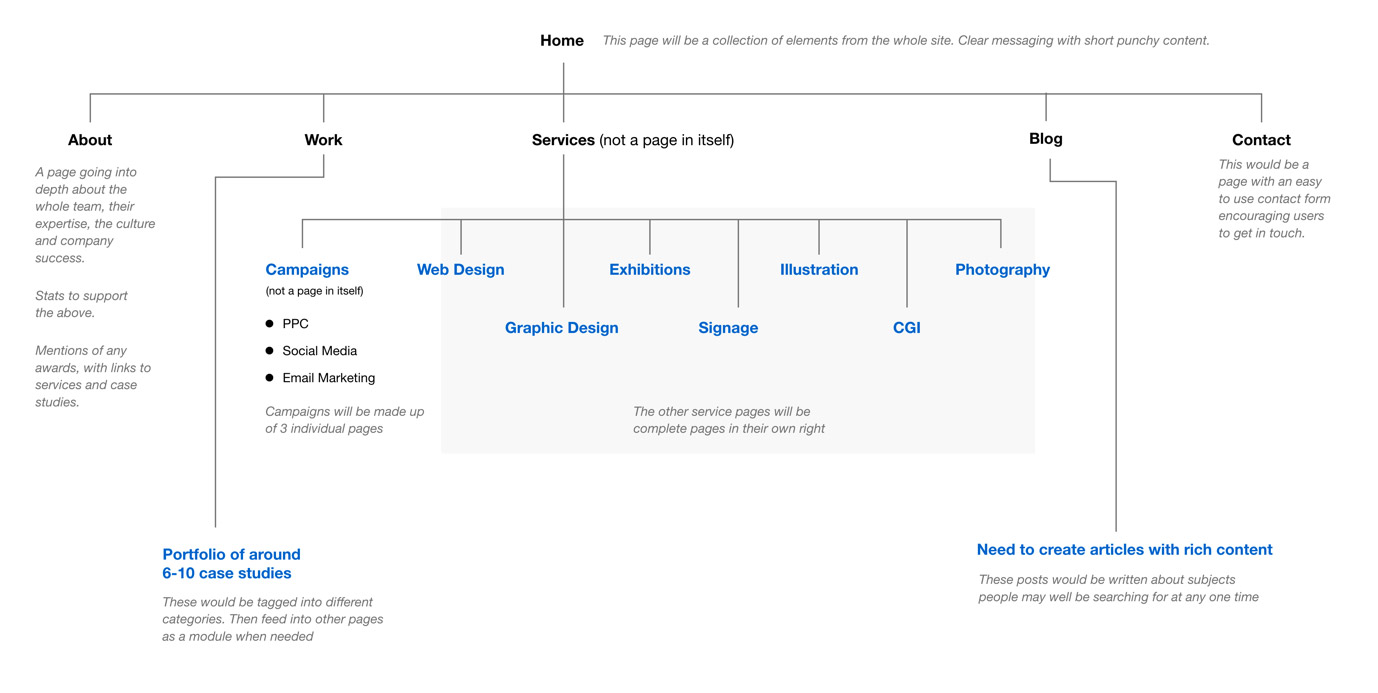
The sitemap stage starts to unlock how the website will take shape by providing a solid foundation to build from. It lays out clearly how the information will be assigned throughout the site while describing the relationship between pages and navigation.
The other benefit is that it sets out an early indicator for required content and a useful reference for the project team to refer to.
4. User Flow
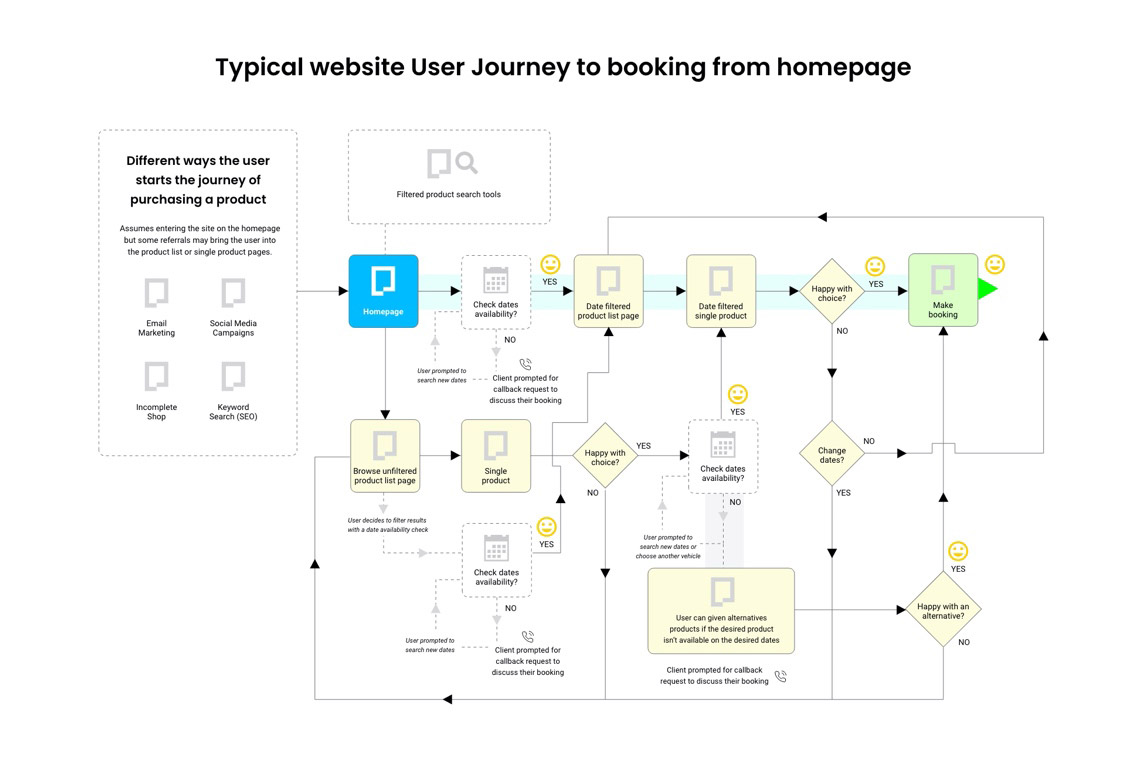
With a more complex website for example ecommerce it’s good practice to work out some User Flow diagrams. This exercise helps to better understand how a user may pass through a website to possible conversion.
This stage puts us in the mind of the site user and helps us anticipate their behaviours and direct us to create solutions that facilitate the desired flow.
These diagrams are a perfect way to ensure users are free from frustration while being a great to communicate the site’s interface to other team members too.
5. Wireframe
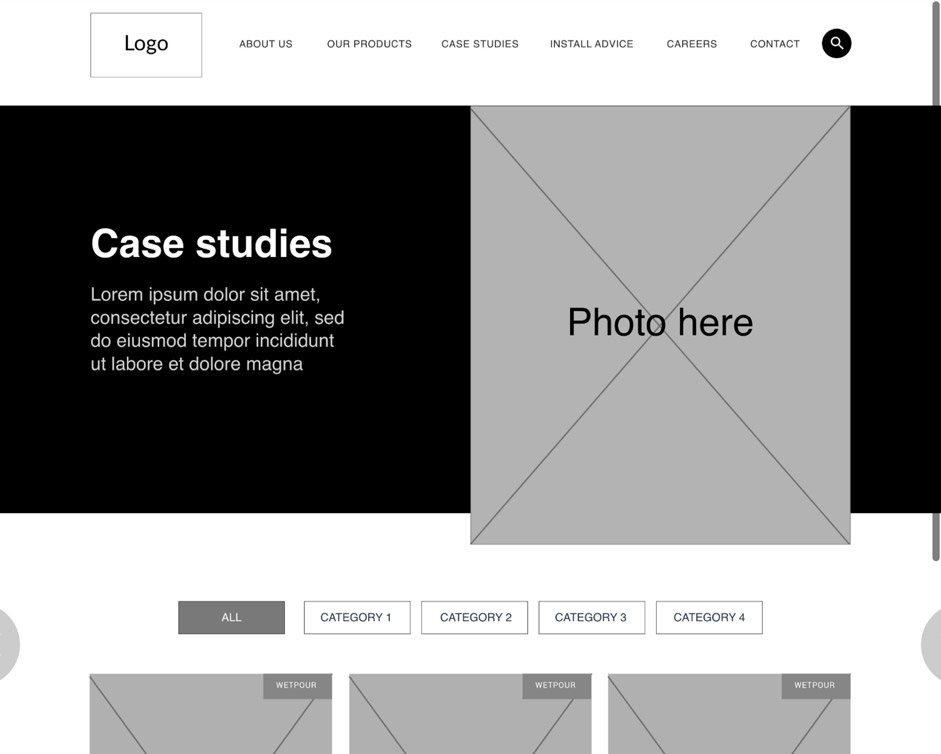
The next stage of our web design process is to start work building a site wireframe of the major pages and page types. Wireframes provide a framework for storing the site’s visual design and content elements and can help identify potential challenges and gaps with the sitemap.
While our wireframes don’t contain any actual final design elements, it does act as a guide for how the site will look and function on completion. Many designers use well known tools like Balsamiq or Figma to create their wireframes. But as I mentioned in a previous post I turn to fully featured Adobe XD for my needs.
6. Content Creation
With the wireframes helping to paint the overall picture of the website we can now concentrate on collating the content from the client. We can also lend a hand to fine tune any supplied copy and images or advise on better options.
When creating page content, it’s always a good idea to keep Search engine optimization (SEO) in mind and focus on a single subject especially on the site’s further pages. Having real content for the next stage makes visual design so much easier and helps speed up the whole process.
Quality content for user engagement
The old saying ‘Content is King’ still rings true when it comes to websites and without it any design will fail to impress and lose users very quickly.
When users land on a page, having quality and relevant content can make the difference whether they continue to browse or bounce right off the site. Good content will encourage them not only to stay but complete actions that lead to desired conversions. See our ‘Quick Wins’ article for more about this.
We always advise to break your content into short paragraphs and manageable chunks that any user can quickly read. This combined with attention grabbing visuals and bold statements keep users engaged and keen for more.
Keyword rich content for website SEO
Quality content is essential to improving a website’s visibility and ranking on major search engines. A good place to start is to work out which keywords or keyphrases you need to include. There are many tools out there to help you with this and uncover what your potential users are searching for.
Website content that is clear, easy to read, informative and of course full of keywords will be more search engine friendly. This means users will have a far better chance of finding the website when searching for products or services you offer.
7. Visual Design
With all the information we have learned and gathered we finally get our teeth into how the website will look aesthetically.
We start by developing the digital brand which in some case may well be in part already established. In other cases, we build this from ground up and look back to the client discovery session for guidance and inspiration.
We then continue to design a consistent visual style for the website. This usually includes a colour palette, typography styling, buttons, icons, galleries and CTAs. This is then implemented on the homepage along with many other visually significant pages such as the blog, product categories, services, contact and so on.
This consistent style is also reflected in the site’s photography with high quality and relevant stock images via from our own bespoke professional photography services. Getting unique images on your website can really help to communicate your core values and give a sense of realism about your company offering.
Our aim with website visual design is to first grab the user as they land on the page, effectively communicate the brand, and then encourage them to engage further. Clever visual design is the key to your site’s success and shouts to the world you are here and ready for business!
8. Website Build
With the visual design agreed it’s time to hand over the reigns of the web design process to the web development team. Here the flat prototypes will be converted into working HTML pages and integrated into a CMS (like WordPress) so the site’s content can be edited by the user after launch.
Our websites are built on a staging area so ongoing work can be viewed by us and the client without having to have the working site live.
The Dev team while building the frontend also make the site responsive so it works seamlessly across any number of devices and touchpoints. Every element is created to size to individual viewpoints including sometimes have a specific mobile menu which often works with one handed use.
Any supplied content is entered while images and photos are optimised for quicker loading. Careful attention is paid to implementing keywords within webpage and H1 titles to help with SEO as mentioned earlier.
Further testing is conducted and referenced back to the agreed design with any styling or functionally issues addressed and rectified if needed.
9. User Testing
I’ve added user-testing near the end of this list but as mentioned before our web design process follows an agile methodology. This means user testing happens throughout design and development and through an iterative process we arrive at a preferred solution.
After the site frontend has been built we conduct further testing to ensure the main navigation is functioning as desired and that no page or content links are broken. Final checks are made that all the pages are loading quickly and responsively across desktop and mobile devices.
Then lastly, we check over the website’s SEO, making sure each page has a meta title, target keyword and meta description.
10. Launch
With everything ready with the client happy the button is pressed and the new website goes live! In the case of larger websites we sometimes conduct a soft launch just to provide everyone with a chance to iron out any bugs or make last minute tweaks. With the digital team and client alike happy we then announce it to the world through social media, but that’s another story!